Project Description
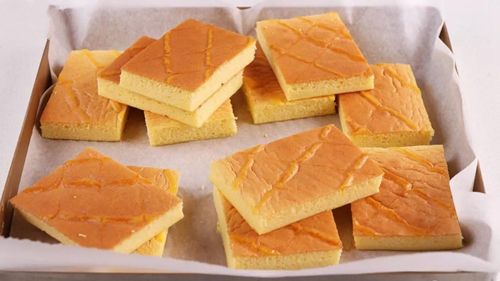
Chiba Pattern Gold Cake
Recently, my friends have been making this golden cake with golden leaves pattern, so we tried it too, and used the blanching method. The taste is between chiffon and sponge. It is firmer than chiffon, lighter than sponge, and the egg flavor is strong and not fishy. It is soft and soft in the texture, which reminds me of the old cake with a particularly strong egg flavor that I ate when I was a child. After eating, everyone agreed that the elderly and children would definitely like this cake, plus the beautiful Chiba pattern, and its appearance. High, the key is that although the amount of eggs consumed is amazing, there is no bit of eggy, it is amazing!
Chiba Pattern Gold Cake
Material
Butter 70g
Low flour 85g
70g milk
Whole egg 60g
Egg yolk 100g
Rum 8g
210g protein
A few drops of lemon juice
90g caster sugar
decoration
Egg yolk one
Bakeware
33*28*4CM
Practice
① Take six eggs first, and separate the yolk and egg whites. (One egg yolk is scattered)
② Sift the low-gluten flour.
③ Put an egg yolk for decoration in a piping bag.
④ Put a whole egg into an egg yolk bowl with six egg yolks, and stir evenly with egg yolks.
⑤ Boil the milk, turn off the heat, and set aside.
⑥ Cut the butter into small pieces, melt and boil over low heat, turn off the heat, add the sieved low powder, and stir well.
★When the butter is boiled, turn off the heat and add the low-gluten flour. Don’t overcook it. This process is quicker, so prepare the low-gluten flour in advance. The whole process should be completed quickly and carefully.
⑦ Add hot milk and mix well.
⑧ The whole egg + egg yolk liquid is added to the batter in batches, and stir evenly.
⑨ Add rum to get rid of eggy (wine must be added). Until it becomes a smooth, particle-free egg yolk batter, set aside. At the same time, the oven is preheated by 180 degrees.
⑩ The egg whites and lemon juice are added three times with sugar, and it is beaten to 9 minutes. Lift the egg custard to have an upright triangle tip. Be careful not to beat it too hard.
⑪ Take 1/3 of the egg whites each time, add it to the egg yolk paste and mix well. Finally, cut and mix into a uniform and shiny cake batter, pour it into the baking pan and shake it lightly.
⑫ Cut a 3-4mm opening in the piping bag with egg yolk, and squeeze parallel lines at 45 degrees from left to right.
⑬ Use a chopstick, perpendicular to the parallel line, draw a line from the upper left to the lower right. On both sides of this line about 2.5-3cm, draw one line from the bottom right to the top left. The two adjacent lines are in opposite directions, and the Chiba pattern is completed after the line is full.
⑭ Put it into the oven preheated at 180 degrees, and bake for about 25 minutes in the middle layer. After the color is ideal, the temperature can be lowered by 10 degrees.
⑮ After baking, take out the cake and let it dry until warm. Cover the surface with another tarp and turn it over. Remove the tarp at the bottom, and then turn it back, the pattern side up, let it cool and cut into pieces. It tastes better after refrigerating!
A slight retraction after finishing is normal.
It is firmer than chiffon, lighter than sponge, rich in egg flavor and not fishy, soft and delicious.

After the filming was quickly eaten, I found that there is no looking down angle of the Chiba pattern display (what is the focus of your shooting? What is the point? Have you eaten it?!) Well, self-punishment gains three kilograms of weight, in order to let everyone have more Good visual effect. Of course, you can also make it thicker, we make it thinner, and it feels thinner to make it harder to fail.

